Designing for Development: Less perfect content, please!

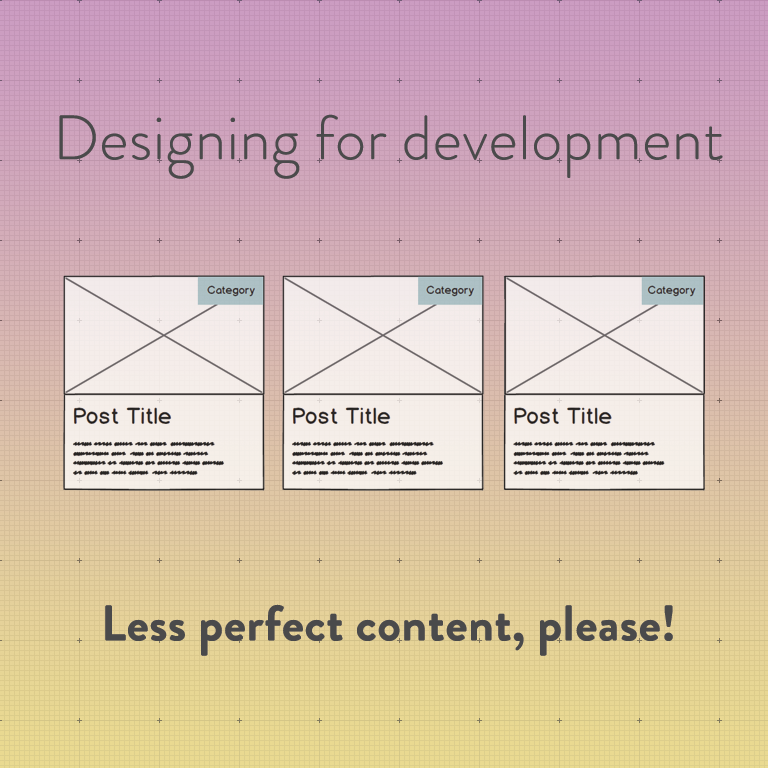
It’s a new year, which means it’s time for a new blog series! This one is aimed at web designers who collaborate with developers. As a developer (who also designs), I’m going to give you some quick tips about how to make your designs more development-friendly!

The first one is about designing around perfect content. Here’s the kind of thing I mean:

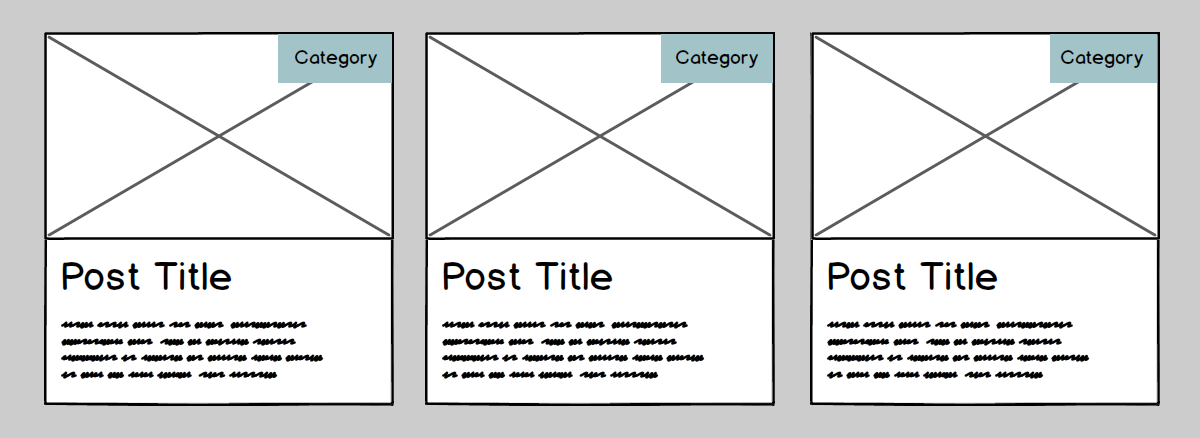
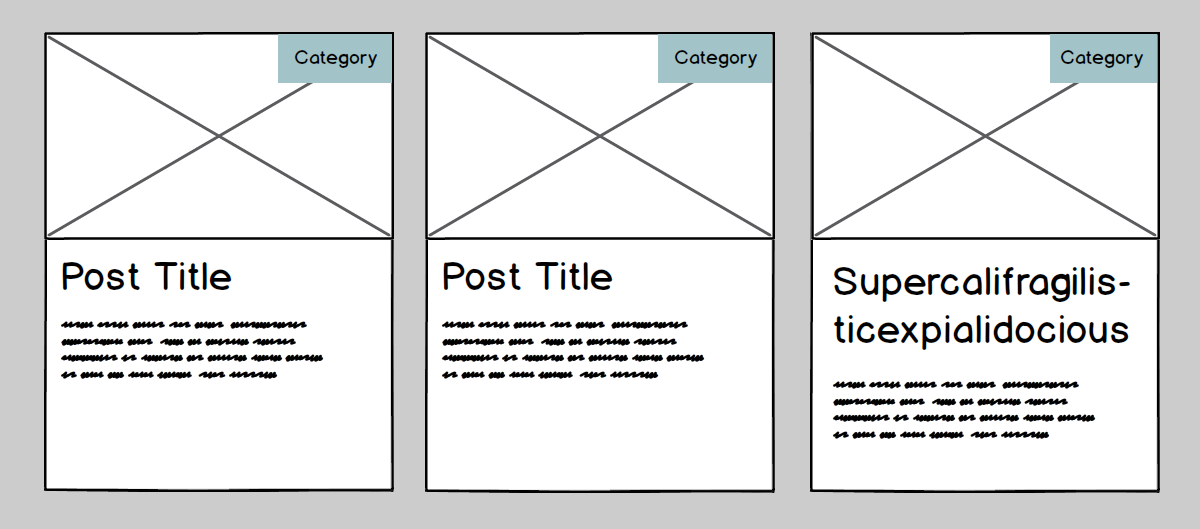
If your client hasn’t given you content yet, it’s tempting to make a grid like the one you see above. What could possibly go wrong?

Well…

I think you get the idea.

When your developer or client starts working with real content, which is always imperfect, cracks often start to show in designs. Sometimes your design will just break, and sometimes developers will start making assumptions about how to handle these cases.

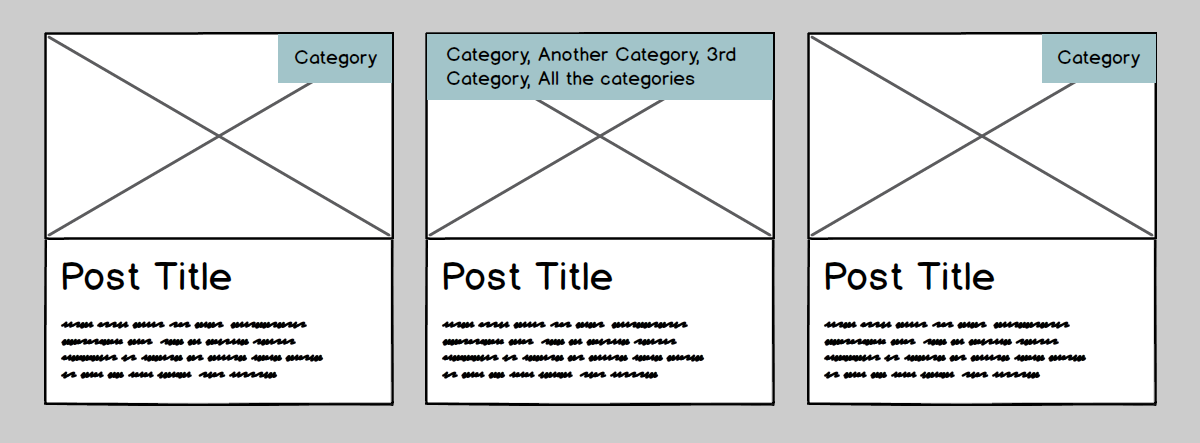
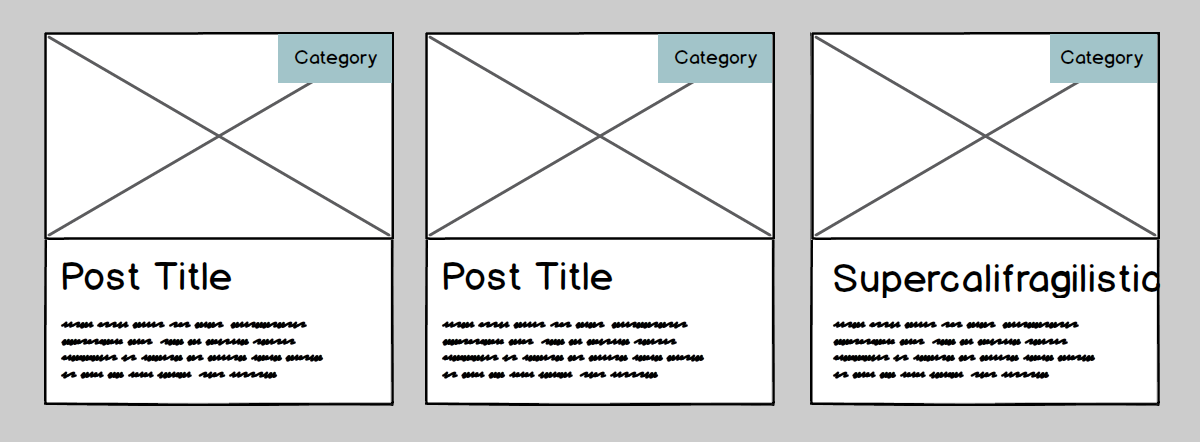
For example, with the grid of posts with one far longer title, one developer could interpret it like this…

…while another developer could interpret it like this:

With the word that’s too long for its container, one developer could interpret it like this…

…another developer could interpret it like this…

… while a not so careful developer might just leave it alone.

Uh oh!

Or, let’s say we have another lovely grid of posts like so:

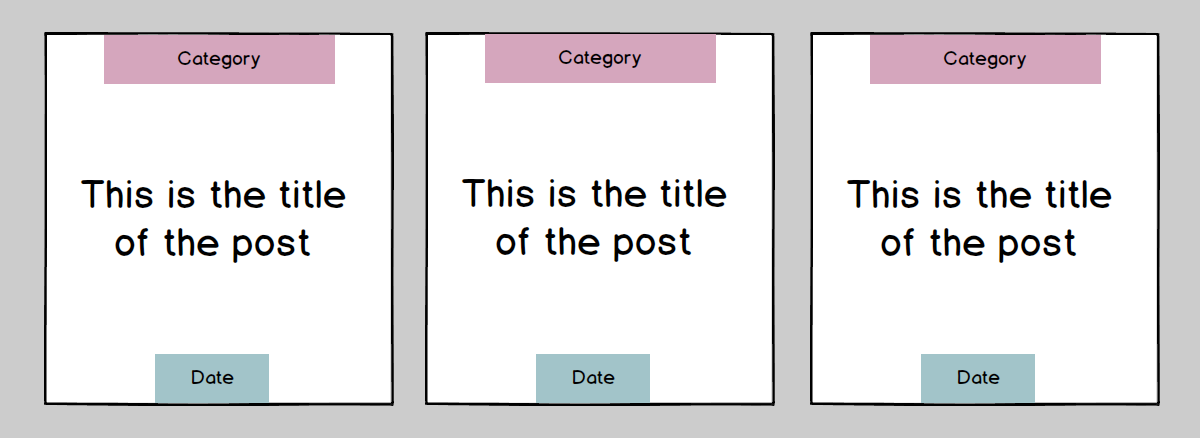
What happens when there’s fewer lines? Does the title align in the centre, or at the top?

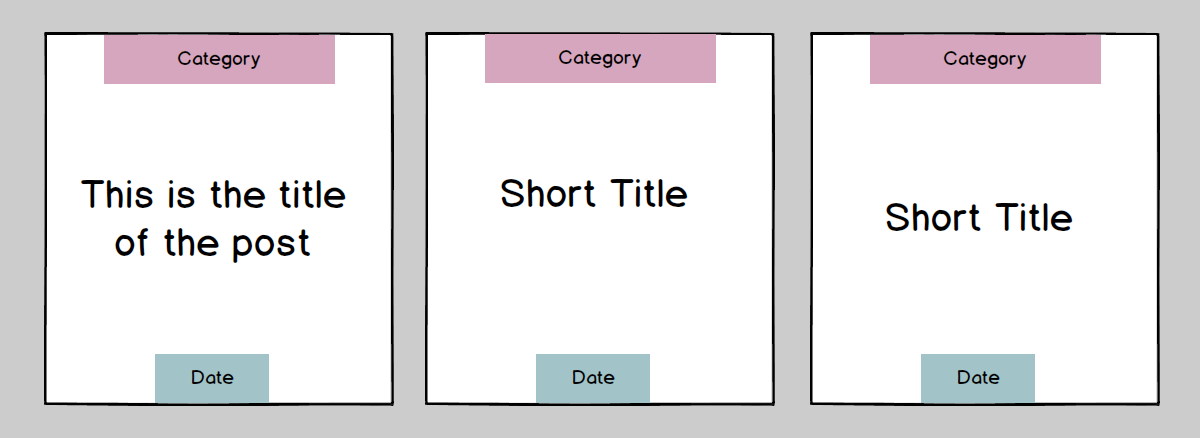
Or… what happens if the title is quadruple the length of your sample title? I won’t illustrate that one; you can use your imagination!

If you’ve designed yourself into a box (literally and figuratively! seewhatididthere?) where a particular piece of content can only be a certain number of lines, you have a recipe for disaster. You can try to tell your client to stick to a certain number of characters, but this is really punishing your client for your design choices. Design should be in service of content, not the other way around. Plus, just try and get them to stick to your character limit. Good luck with that ????

By the way, if you think that this doesn’t apply to you because you’re designing with real content instead of sample content (hooray! you rock!), think again. You don’t know what kind of content your client is going to create in the future!

If you’re working with a design-conscious developer, they can be really helpful in these situations. If you haven’t thought about these cases, a developer who understands how good design looks and feels can probably figure out a best case scenario to handle these situations. But, as you may have experienced, not every developer is also a designer, so leaving these situations in another person’s hands leaves some potential for disappointment, on your part and your client’s.

To make your designs as development-friendly as possible, do a little brainstorming before you start designing about potential variations in the content. Write ‘em down! Then, when you’re designing, decide how you would like to handle these non-perfect cases. That way, your developer will know exactly what to do when they arise (which they will), your client won’t be surprised when the site looks slightly less perfect than your perfect design, and everyone will be a lot happier!


Psst – have a free minute or two? I’m looking for your input! I’m creating a workbook for designers and developers to communicate better with each other and create a process that works best for them. To make it as useful as possible, I’m looking for feedback/rants/etc. from web designers and developers who collaborate with each other. Want to tell me what you really think? Fill out this quick + painless survey. Thanks for your time! ❤️

Alternatively, don’t care to share but want to find out more about it when it’s released?

Developer Tip Tuesday: Always develop locally (part 2)

Part 2: Software!

At last! The very long-awaited (oops) sequel to my previous post about why it’s so important to develop websites locally. In my first post I gave you the theory, and in this one I’ll give you some more practical information.

This post is going to focus on developing WordPress sites, because if you’re developing something more complicated than that, you probably already know enough about local development, do everything via command line, and don’t really need me! ;D

Running the local server

As you’ve probably already figured out, WordPress is written in PHP, which is a server-side language. This means that the website has to communicate with a server in order to display the pages, unlike a static HTML website. WordPress, like most content management systems, separates the site’s structure (which is PHP-based) from its content (which is stored in a MySQL database). The server is what brings the two together, and this is why you need a server with PHP and MySQL to run WordPress.

I personally run my local servers by using a program called MAMP. The WordPress Codex (aka your new best friend) has a good article about how to set up WordPress with MAMP. If you’re not using a Mac, you can use XAMPP for Windows, which works similarly. If the Codex is a little too dry and/or confusing, there’s a great screencast over at CSS Tricks on this very topic! Essentially, MAMP (or XAMPP or one of the other alternatives) sets up Apache, MySQL and PHP on your computer, which lets you run a local server that you can access, but that isn’t online for everyone else to see.

One drawback of the free version MAMP is that you can only have one local server running at once, and its address is always localhost:8888, which can be fairly limiting, especially if you’ve taken on multiple projects at once (story of my life). If you’re going to be developing locally a lot, I’d recommend shelling out for MAMP Pro, which lets you run an unlimited number of local servers and name them whatever you want. I use MAMP Pro, and all of my local sites are named [sitename].dev. These local URLs are really easy to remember, and way sexier than localhost:8888… am I right?

Edit! Thanks to @Wordius on Twitter for reminding me that even in regular (free) MAMP, you can have an unlimited number of sites — they’ll all just reside at http://localhost:8888/[insertsitenamehere]. I prefer having separate local domains for each installation for a variety of reasons, but it’s not entirely necessary, especially if you’re just starting out.

This is my MAMP screen, and to the left are the zillions of local installations I have set up right now (including a local version of my own website, where I test all of my changes first before they go live). And no, don't worry, I'm not working on them all at once!

This is my MAMP screen, and to the left are the zillions of local installations I have set up right now (including a local version of my own website, where I test all of my changes first before they go live). And no, I’m not working on them all at once! I might be crazy, but not thaaaat crazy.

I’ve recently heard of another (free) program called AMPPS that provides similar functionality to MAMP. I haven’t tried it myself, but it may be worth looking into. If you’ve used it, let me know what you think!

Developing the actual site

As I mentioned in my previous post, one of the biggest advantages of coding locally is being able to use a nice text editor with syntax highlighting to do your work (as opposed to the horrors of the WordPress built-in editor), which lets you easily undo any catastrophic changes that you may or may not make. The best part about developing locally is that you’re never breaking anything that anyone else will see. It’s pretty nice when you take that pressure off yourself!

My current editor of choice is Sublime Text, which I’ve been using for about a year now, and it’s a real pleasure now that I’m used to it. I appreciate that it gets out of the way and lets me code in peace, but also has a ton of useful functionality under the hood. Before using Sublime Text I was a huge fan of Espresso, which has a really beautiful, friendly interface and some nice extra CSS features, like a built-in gradient generator. I only switched away from Espresso because I was doing a bunch of work with Sass and Haml, which Espresso didn’t support very well. You snooze, you lose, Espresso!

Leveling up your dev environment

One of the other joys of local development is being able to live reload your changes without having to manually refresh the page in the browser. Right now I’m using CodeKit for this purpose (as well as for using Sass, which is so awesome and useful and time-saving that it deserves its own post). Once you get used to seeing your changes happen in the browser without having to refresh, you can never really go back. I have a nice, big display, so I often have my code editor open on one side of my screen and the browser on the other, like so:

This resized image doesn't convey the majestic nature of having a 27" display. What is this, a display for ants? It needs to be at least three times this size!

This scaled-down image doesn’t convey the majestic nature of having a 27″ display. What is this, a display for ants?

Adding your WordPress project to CodeKit is super easy. With your CodeKit window open, click on the plus sign in the bottom left hand corner, and click “Add Project…” and find your WordPress theme directory (the one inside /wp-content/themes/). Open the directory, and now CodeKit is monitoring your work and will live-reload all of your changes (as well as run CSS pre-processors if you choose, minify your JavaScript, optimize your images, and all sorts of other stuff). Easy!

Like so!

Like so!

Okay, that’s cool, but now how do I get my local site on a real server?

Glad you asked! Since this post is nearly 1000 words at this point (!), it’s probably best to save that for another time instead of putting you to sleep by continuing this epic saga. In the meantime, I’ll refer you to another very helpful screencast at CSS Tricks that will walk you through this process. What this video shows is basically what I do (though I think I do a couple of things more efficiently) so definitely take a look and see if that helps you.

Till next time!

Want more articles like this? Get ’em in your inbox!

Developer Tip Tuesday: Always develop locally

This is a series of posts wherein I share the dev mistakes that I used to make, and hopefully help others in doing so! Also, I reserve the right to publish these either on Tuesdays or Thursdays. As long as the title is cheesy and alliterative, I’m happy.

Back when I was a young developer just learning the ropes, I did some silly things. One of them, as you can probably guess, was developing live (making changes on a live server) instead of locally (on my computer). I was full of excuses:

“But this site barely gets any traffic! If I make a few changes live, who will notice?”

“If I code this site right on a staging server, I don’t have to migrate the site from my computer to the server because it’s already there!”

“Setting up a local server sounds hard and I’m lazy!”

I’ve heard it all, because at some point I’ve said it all. First, let me walk you through the three main ways one can code a site:

Worst: Developing on a live/production site

In my defence, even back in the old days, I didn’t do this too often. After all, it would be ridiculous to develop a full new site from scratch in a public location where everyone could see it. But, not gonna lie, sometimes when I was asked to add new features to an existing site, I found myself being both lazy and overly optimistic and just quickly doing it live on the server.

Overly optimistic? Yep! I was assuming that I wouldn’t make a mistake that would mess up the live site and even potentially ruin my reputation as a developer. And when it’s easy to take out a whole site with a single missing semicolon, this was actually a pretty real risk.

Sub-Worst: Making changes to a WordPress theme using the built-in editor

noooooooooooooo

noooooooooooooo

If you are going to go ahead and make changes to a production WordPress site right on the live server, please never do it in the built-in editor. While HTML and CSS are pretty forgiving, one can royally screw up stuff in PHP (see above about missing semicolons taking out whole sites), and if you make a mistake in the online editor, you risk taking out your entire site with a White Screen Of Death™ and not even knowing why. Usually you’ll only take out the front end of your site, but in some cases, you can even lock yourself out of the admin pages. Know what’s super fun? Trying to restore your website when you can’t even access your website. Don’t do it, kids!

Don't let this happen to you!

Don’t let this happen to you!

Better: Developing on a staging site

So, you’ve decided instead that you’re going to develop your site on a staging server or a test site that only you and the client have access to. That’s obviously way better than making changes on a production server, because at least it’s private and if you mess something up, the public doesn’t have to know! Yay!

That being said, here’s what I don’t like about this method:

  1. Working off the server means that you’re at your server’s (and your Internet connection’s) mercy. All servers have outages at some point, and because the universe totally hates you, it’ll obviously happen when you need it the most.
  2. FTP is slow, dudes. There’s a lot of waiting and reloading with this method, and I’m impatient.
  3. Your super secret site might not be so super secret. I’ve found other developers’ “secret” “staging” sites in Google before when I wasn’t even looking for them. Oh noes!
  4. Once you’ve given out the secret address for your client to see, they can/will see all the further changes you make, and might see some mistakes that you make (or wonder what happened to the site when it’s taken out by the missing semicolon of doom). When I’m troubleshooting code or trying new features, I’ll often do strange things like outline elements in weird colours, use cats and Samuel L Ipsum as placeholders, and will occasionally console.log(‘some very profane things’). I don’t necessarily need my clients seeing all of that (though, to be honest, I’m pretty shameless about the cats).

Best: Developing locally alongside a staging site

Naturally, my favourite solution is to always develop sites locally (on my computer) so that the only people who can see the site in its incomplete state are me, myself, and I. Then, when I’ve finished, I upload the site to a super secret staging server (which I’ve made sure is hidden from search engines) for the client to see. Any time I have changes to make or bugs to fix, I go back to my local server to make the changes, and then push the changes to the staging site when I’m good and ready. This might sound tedious, but trust me, it’s saved me a lot of grief.

This method is awesome because:

  1. Developing locally is crazy fast! No need to wait for changes to upload or for pages to reload. There are various apps that’ll refresh your browser automatically every time you save a file, and let me assure you, this is a magical experience from which there is no turning back.
  2. I can screw up as much as I want in the comfort of my very own computer. Clients and the public only ever see the site when it’s in good shape. Life is much less embarrassing this way.
  3. Client-facing sites will never succumb to the White Screen of Death™ due to a missing semicolon.
  4. During development, I always have an up-to-date version of the website on my computer in case anything happens to the server.

Coming up next: How I develop locally!

Are you intrigued about the idea of developing locally? If so, stay tuned! My next post in this series will go into detail about how I develop locally, which programs I use, and other fun tips and tricks. And if you disagree with any of this, that’s cool too! Feel free to share your perspective in the comments below or reach out on Twitter.

Want more articles like this? Get ’em in your inbox!