If I’m going to be spending hours at a time working away in one place every single day, I want to really like it. For better or for worse, I spend a lot of time at my desk in my ‘home office’ (doesn’t that sound fancy and grown up?), and after having worked in some pretty hideous setups (some of my own old rooms included), I can confidently report that I’m way more happy and productive when I’m in a space that I actually like. (Crazy, right?) With that in mind, I decided to walk you through how I made my workspace into one that I actually enjoy.
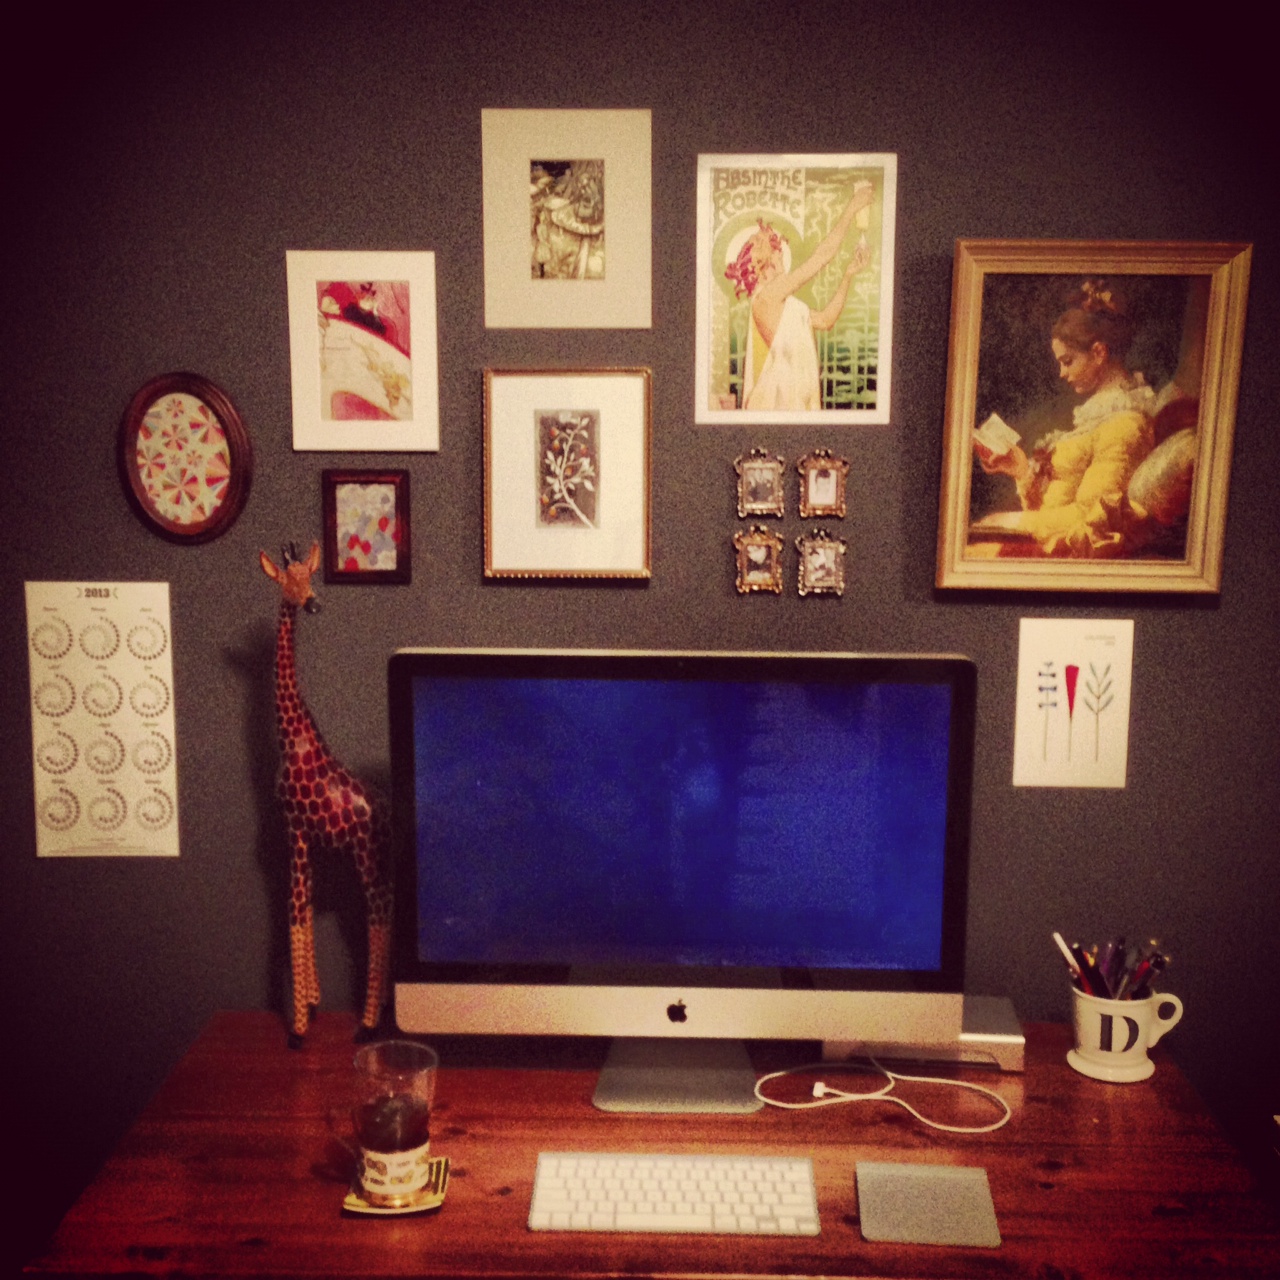
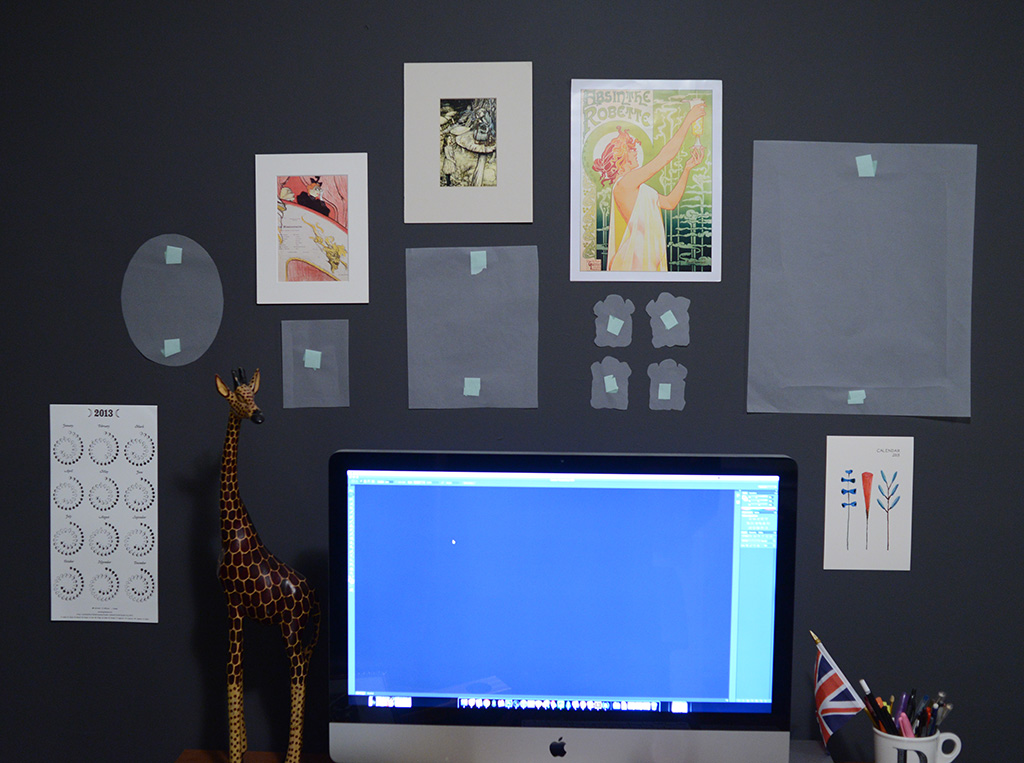
While buying new furniture can be expensive and a little heart-wrenching, it’s pretty easy to make your walls awesome with minimal pain and hassle. Here’s what mine looks like, in all its Instagrammed glory:
And here are the steps to put one together yourself!
1. Paint your wall an awesome color
As a designer, I am contractually obligated to tell you that colour is, like, totally important. In all seriousness, though, the wall colour totally dictates a room’s look, feel, and atmosphere, so picking one you like can really improve how you perceive your workspace. When we moved into this apartment, the wall was a colour that I quickly named Poopy Grey:
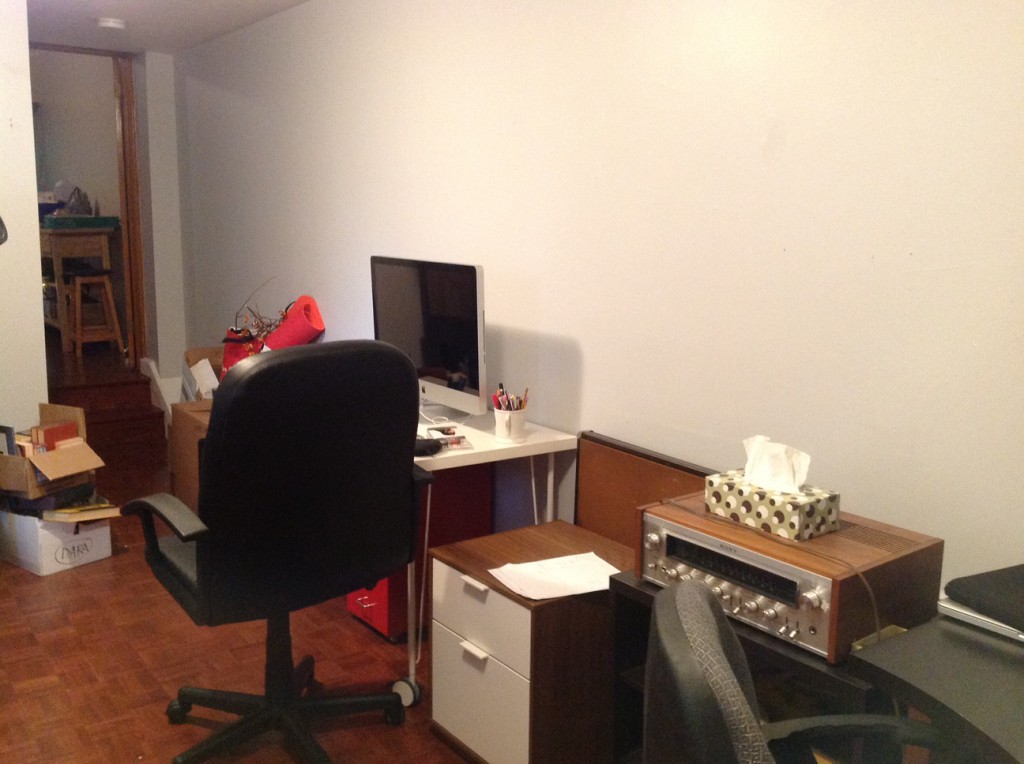
It took hours and hours to properly stage this beautiful shot.
Although this particular shade of light grey might be someone else’s favourite colour (maybe the last tenant’s?), it wasn’t my style at all, so it had to go. I decided to paint this wall a nice dark grey because I found it both dramatic and calming, and so that any art would stand out nicely against it. The rest of the walls in the room are white, which a) helps the one dark wall seem more prominent and b) keeps me from feeling like I’m working in a cave. The colour I chose is Benjamin Moore’s Gray. I was a little disappointed that it didn’t have a fancier name, but you can’t always get what you want.
2. Gather awesome art that makes you happy!
This is by far the most fun step, and you can do this all at once, or gradually over time. I definitely took the latter approach — I’ve been collecting art and prints since I was in high school. This is totally not surprising at all given that I studied art history, but you definitely don’t need academic training to know what you like! It’s nice to build up a bit of a ‘collection’ over time and then pick and choose which pieces go up on your walls. Let me walk you through the art I chose to feature:
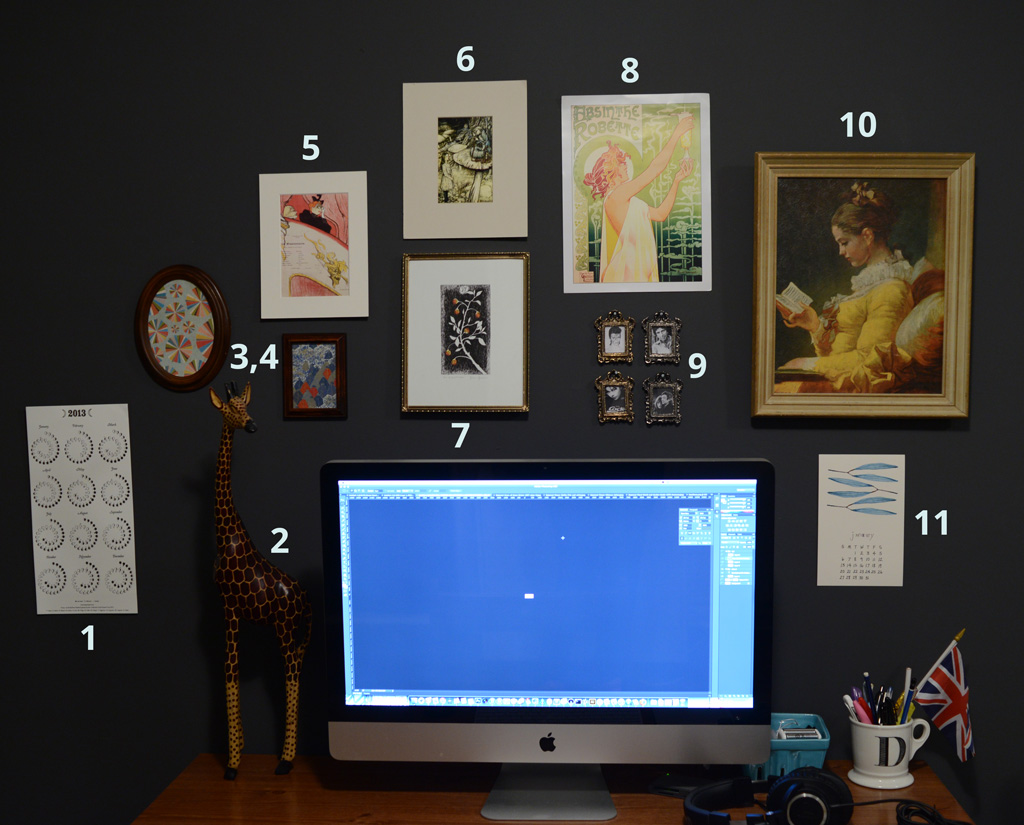
- 2013 lunar calendar by Margins Imprint that I bought at a bookstore in Brooklyn this October
- Mr. Giraffe! He’s been with me through three apartments now. I acquired him one summer at the CNE.
- This is actually just a piece of (awesome) paper that I bought at The Paper Place on Queen St. West (which is totally worth a visit if you’re from Toronto and haven’t yet been).
- This one, too!
- Small print of a poster by Toulouse-Lautrec. I got it in Amsterdam of all places.
- An Alice in Wonderland print, which I embarrassingly found at a university poster sale.
- Tarot card print from The Wild Unknown.
- Art Nouveau print that I bought from a little stall on the Seine in Paris. I almost didn’t buy it because I already had a zillion other clichéd, stereotypical French prints, but this one was too awesome to pass up.
- I “borrowed” these frames from my grandmother’s basement. In it are black and white pictures of some of my musical heroes: David Bowie, Leonard Cohen, Björk, and Serge Gainsbourg + Jane Birkin. I was feeling a little nostalgic about being a teenager with tons of band posters on my walls and wanted to bring that back, but in a slightly less tacky way.
- This reproduction of A Young Girl Reading by Fragonard was procured at a super fancy shop called Value Village. Maybe you’ve heard of it?
- Lovely monthly calendars by Bookhou.
Other sources include sites like Etsy and local craft shows. For example, I’ve seen tons of great art at City of Craft in Toronto. You can check out Andrea Jaggs‘ recap to see what I mean! Supporting local and independent artists is awesome because it’ll give you warm, fuzzy feelings as well as ensure that some of your pieces are unique.
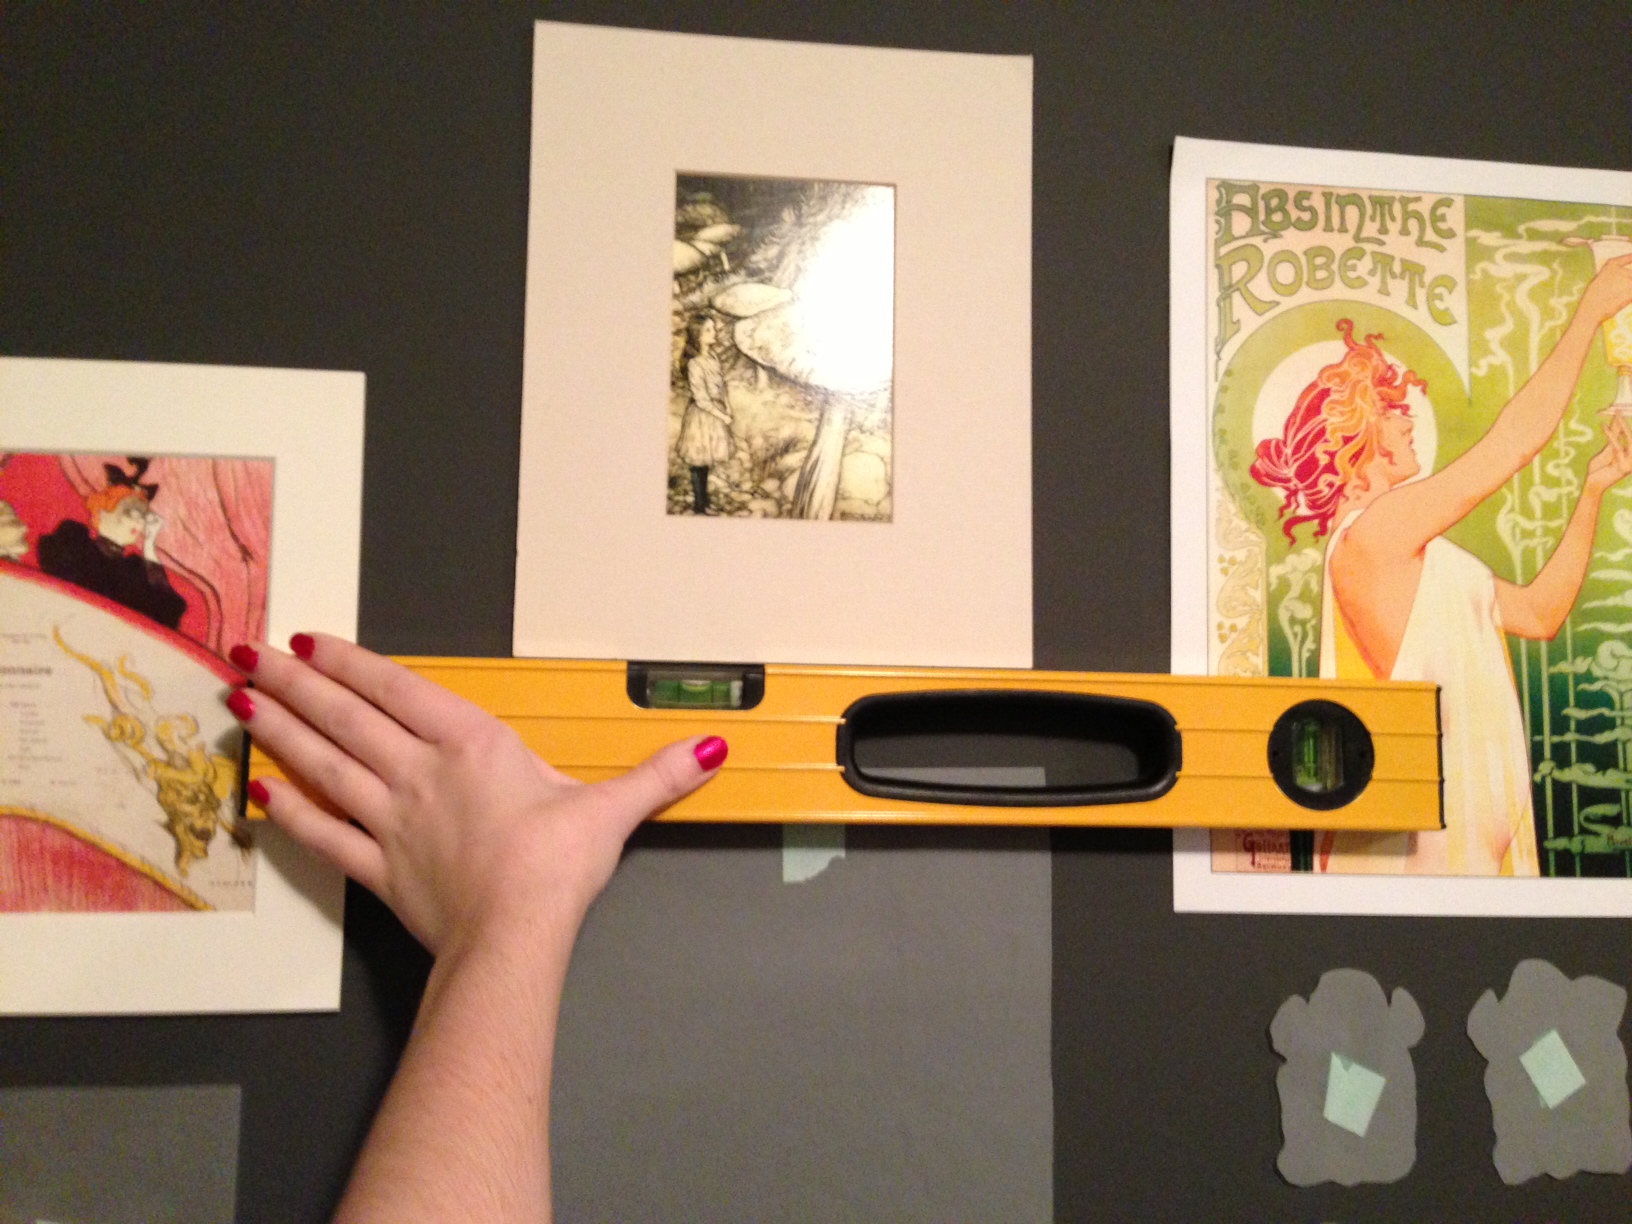
3. Figure out the arrangement before you hang it
Like so:
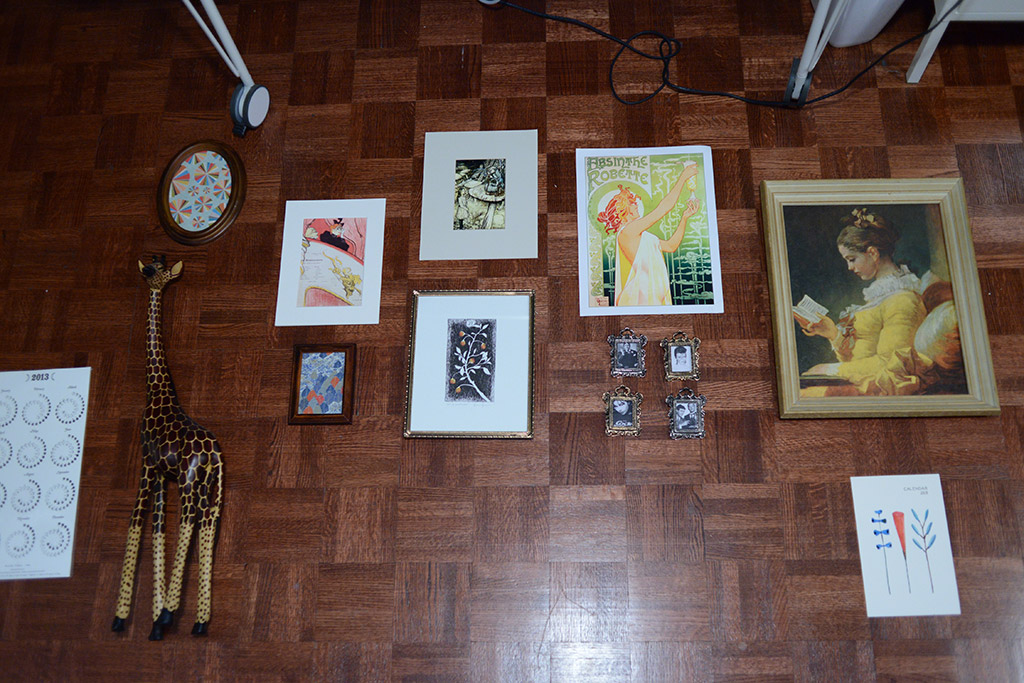
And make sure to take a picture (or two) so you can replicate it later.
4. Put up decoys for placement
Like so:
I thought this bright idea was original, until I was informed that it’s been all over Pinterest for ages. So much for that.
Hammering a bunch of nails into your wall is a bit of a commitment, so going through this step helps you arrange things exactly as you like. I taped all of the light, frameless prints straight to the wall using painters’ tape and used paper decoys for the framed pieces.
5. Hang your art
Optional: drive yourself crazy by attempting to use a level.
6. Enjoy!
How do you like to decorate your favourite spaces and make them feel like your own? Let me know!
I love this! I love art walls like this, but I feel so totally overwhelmed with trying to come up with one on my own but you’ve broken down the process into something I could totally understand. Thanks!
Yay, I’m so glad this could help! It definitely is a bit overwhelming — I’d been talking about doing this for months before I actually did :P
I love seeing other people’s gallery walls. Such a great setup above your desk. It looks amazing!
Thanks so much!
Love the grey wall colour too! :)
Thanks :D The idea of painting a big wall dark grey was totally scary at first since I’d lived with white walls for my entire life (and the idea got a few raised eyebrows) but it all worked out! Phew!
I LOVE the color you painted your wall. It’s the perfect color!
Thanks! :D Picking paint colors can be kinda hit or miss, so I’m lucky that it turned out!
Dara, your office looks great! It’s so important to have a workspace that you love. I’m in the process of revamping mine right now. A clutter free space surrounded by artwork and other quirky pieces that represent yourself I think are important. As is having an area (cork board, magnet board or table) to layout notes, images or items of inspiration that can evolve as you work are helpful too.
Thanks, Andrea! An area for notes/images/inspiration is a really great idea. I store most of my notes/inspiration digitally but there’s nothing like actually seeing stuff in front of you in the real world. I want to see your space once you’re done revamping!
Looks great! I have recently become a bit obsessed with the idea of gray walls…hopefully we will be buying a house soon so I can get away from our boring all-white rental :-p
Thanks, Brittany! I totally hear you on the woes of rentals. I live in a rental and luckily the landlord is super nice and had no problem with us painting, but the last place I lived in was all white and I wasn’t allowed to paint either. So sad. And such a silly rule, since anything can be painted over!
I agree: a great workspaces makes for better productivity, and of course, a happier worker.
I love the whimsical arrangement of your artwork, as well as the diversity of the art pieces that you chose. Their vibrance goes well with the new dark grey wall colour. Great job.
I have yet to make my own art wall. It’s still in the conceptual phase, and I abandoned it mid-way for other projects. But seeing the results of other people’s projects gives me the incentive to take a crack at it again.
Thanks so much! And I’m glad that this and other posts have inspired you to tackle your own project. It is totally daunting at first, but then it feels awesome when it’s done! (Although decorating projects are never REALLY done. Haha. Always room for improvement!)
This looks totally amazing! I absolutely love how it is right above your computer screen, perfect inspiration!
Thanks so much, Yelle :D Now I just can’t ever move my computer, haha.
Love this post, Dara! :) I should revamp my workspace soon! :) Might blog about it too!
FUUUUUUN! xxx
Hey Femke :D You should definitely blog about it. I can’t wait to see what you come up with!
Hi Dara, I’m so jealous of your iMac. I’d been waiting for a refresh in the iMacs for almost two years and when that finally happened I signed up for HackerYou and needed a laptop instead so my boyfriend bought himself a Lenovo laptop and loaned it to me for the duration of the course but I’m a Mac person all the way. I hate designing on a laptop screen but right now I don’t have a dedicated office space so I have nowhere to put it and will probably buy a new MacBook Pro this month as I start my job hunt since for the moment, portability is key. My ideal setup would be to have both. :)
Hey, Dagmara! Thanks for stopping by :D
I used a laptop for years and years before finally committing to the iMac, so I totally hear you. You’re going to love having a MacBook Pro! You can even get a second monitor at some point, so your laptop can turn into a pseudo-desktop if you find ourself with dedicated office space. For the first time in years, I don’t have a laptop at all, and I’m surprisingly totally okay with it. Sometimes it’s nice to not be able to take your work with you everywhere!